Using GitHub Pages with Jekyll
Getting Started
- Sign up for a new GitHub.com account or use your existing account.
- Documentation uses the following versions of software
These are not the minimum required versions, only the versions I utilized when creating this documentation post.
Introduction
This post is documentation of setting up this Jekyll site with the Chirpy theme using GitHub Pages for hosting and continuos deployment using GitHub Actions. The post may also serve as a tutorial for anyone who may want to follow the same steps to create their own GitHub Page with Jekyll.
Using chirpy-starter template repository
Sign into GitHub.com with your account.
If you are not signed in the chirpy-starter link below will return a 404 error page.
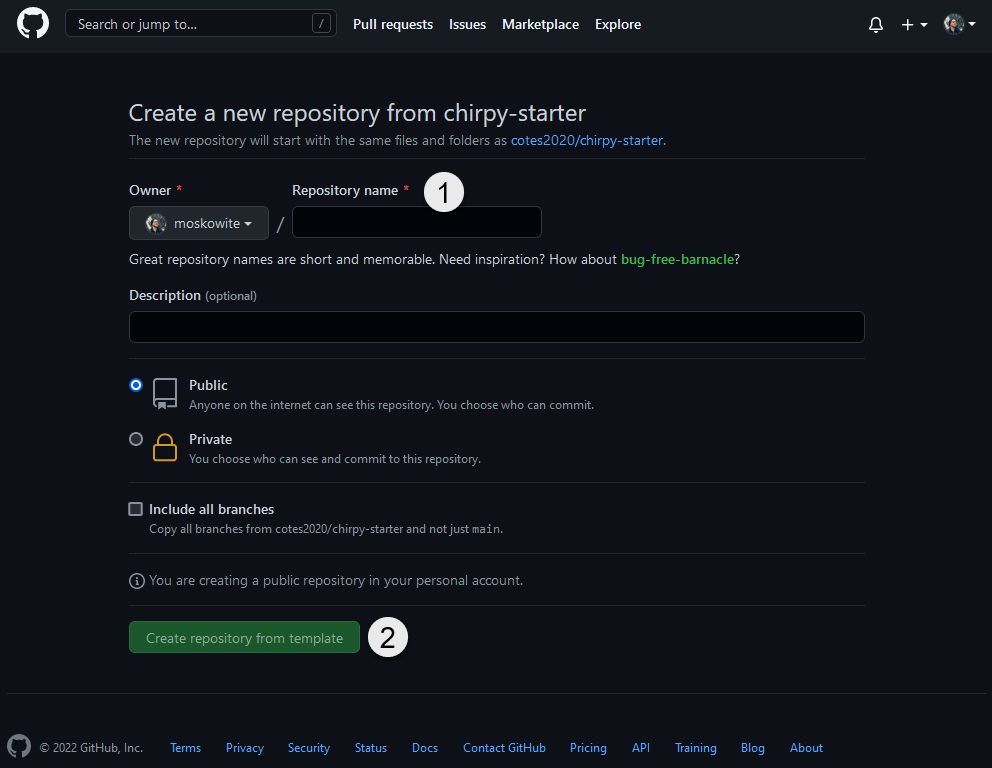
Navigate to github.com/cotes2020/chirpy-starter/generate to create the repository using the chirpy-starter Jekyll theme template.
The repository name is required to be username.github.io - where the username represents your GitHub.com username. For example, my username is moskowite therefore my repository must be named moskowite.github.io.
For the remainder of this post, I will be using moskowite as the username.
Enter moskowite.github.io as the repository name to work with GitHub Pages.
Click Create repository from template to create the repository.
Build and deployment using GitHub Actions
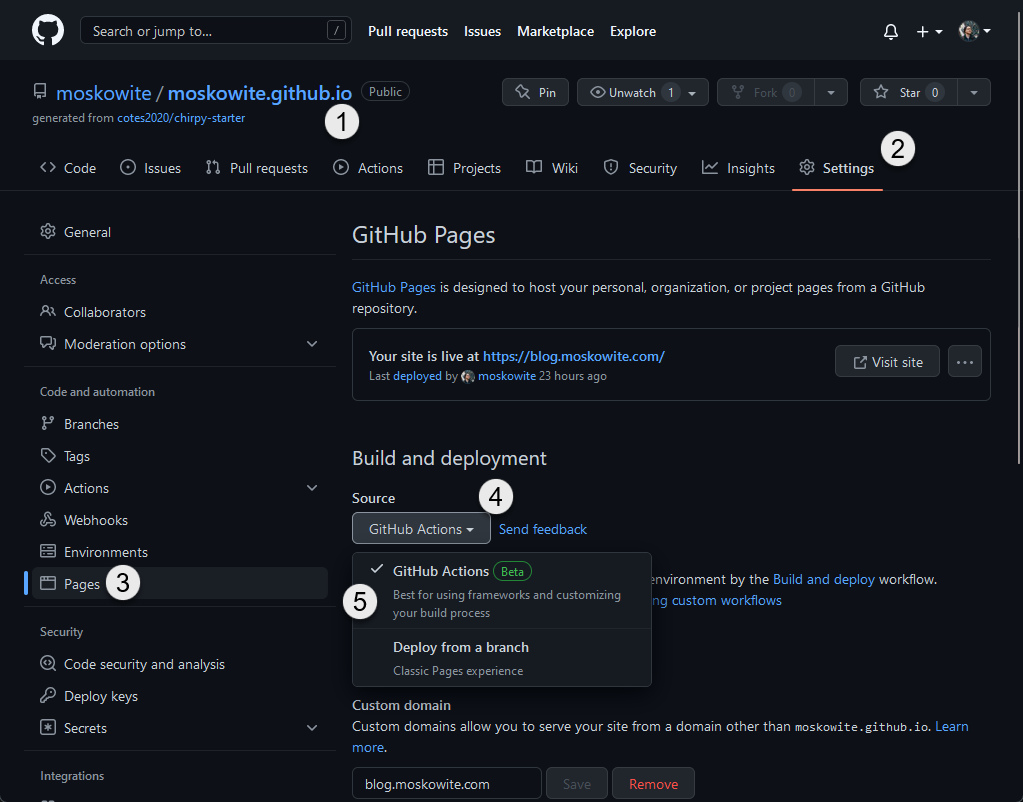
Once the repository is created, GitHub Pages will need to be configured to use GitHub Actions to automate the build and deployment of Jekyll when a commit is pushed to the main branch of the repository.
Chirpy-starter comes delivered with .github\workflows\pages-deploy.yml defining the Build and deploy workflow for GitHub Actions. No changes are required to get this working in the template.
Navigate to moskowite.github.io repository page on GitHub.com.
Open Settings page from the repository navigation header.
Select Pages from the left sidebar.
Expand the Source dropdown menu.
Select GitHub Action from the Source dropdown menu.
Update the Jekyll YML configuration file
The _config.yml file is located in the root of the newly created repository.
First clone the repository using the git clone command. There are many ways to clone a git repository. Check out my About page for more information.
Open PowerShell then navigate to the directory to clone the repository, and run the git clone command below.
1
git clone https://github.com/moskowite/moskowite.github.io.git
Use the PowerShell alias ii for the Invoke-Item cmdlet which will open the file in the configured default application for the .yml extension.
1
ii .\moskowite.github.io\_config.yml
Populate or update the following keys in _config.yml to get started;
titletaglinedescriptionurlsocial.namesocial.emailsocial.linksgithub.usernameavatar
1
2
3
4
5
6
7
8
9
10
11
12
13
14
15
16
17
18
19
20
21
22
23
24
25
26
27
28
title: moskowite                          # the main title

tagline: code, devops, and tech   # it will display as the sub-title

description: >-                        # used by seo meta and the atom feed
  code, devops, and tech

# fill in the protocol & hostname for your site, e.g., 'https://username.github.io'
url: 'https://moskowite.github.io'

social:
  # Change to your full name.
  # It will be displayed as the default author of the posts and the copyright owner in the Footer
  name: Tyler Moskowite
  email: tyler@moskowite.com            # change to your email address
  links:
    # The first element serves as the copyright owner's link
    # - https://twitter.com/username      # change to your twitter homepage
    - https://github.com/moskowite      # change to your github homepage
    # Uncomment below to add more social links
    # - https://www.facebook.com/username
    # - https://www.linkedin.com/in/username

github:
  username: moskowite             # change to your github username

# the avatar on sidebar, support local or CORS resources
avatar: https://avatars.githubusercontent.com/u/858034
Go to https://api.github.com/users/moskowite and locate the URL in avatar_url from the response. The URL is used to populate avatar in _config.yml.
1
2
3
4
5
6
7
{
  "login": "moskowite",
  "id": 858034,
  "avatar_url": "https://avatars.githubusercontent.com/u/858034?v=4",
  "url": "https://api.github.com/users/moskowite",
  "html_url": "https://github.com/moskowite"
}
Test and validate changes
The last step before commit the changes to the local repository and push to the remote repository hosted on GitHub.com is to test and validate the changes made to the _config.yml file.
Dependencies must be installed first by Bundle by executing the bundle install command below in the root directory of \moskowite.github.io. Please note bundle and bundle install are identical commands because bundle’s default task is install.
1
bundle install
After installing dependencies bundle exec calls the Jekyll gem’s serve command build and serve the site locally. This will also automatically update the local site whenever a source file changes while the command is running. The website will be available by default at http://127.0.0.1:4000/.
If the site is not available please refer to source documentation for further troubleshooting.
1
bundle exec jekyll serve
Commit changes to GitHub repository
After testing and validating the changes to _config.yml, the changes will need to be committed to your local repository using the git commit command by executing the command below in the root directory of \moskowite.github.io.
1
git commit -am 'Updates to _config.yml.'
Finally, use the git push command to push the committed changes to the defined remote located origin on the main branch.
1
git push origin main
Navigate to https://moskowite.github.io/ to view your changes once GitHub Actions workflow has completed successfully.
The website should load without any posts in the body of the page. I’ll look at creating another documentation and tutorial post on creating posts for this Jekyll GitHub Pages website.